


Introduction
The VXLAN (Virtual eXtensible Local Area Networking) protocol is a tunnelling protocol designed to solve the problem of limited VLAN IDs (4096) in IEEE 802.1q. With VXLAN the size of the identifier is expanded to 24 bits (16777216).
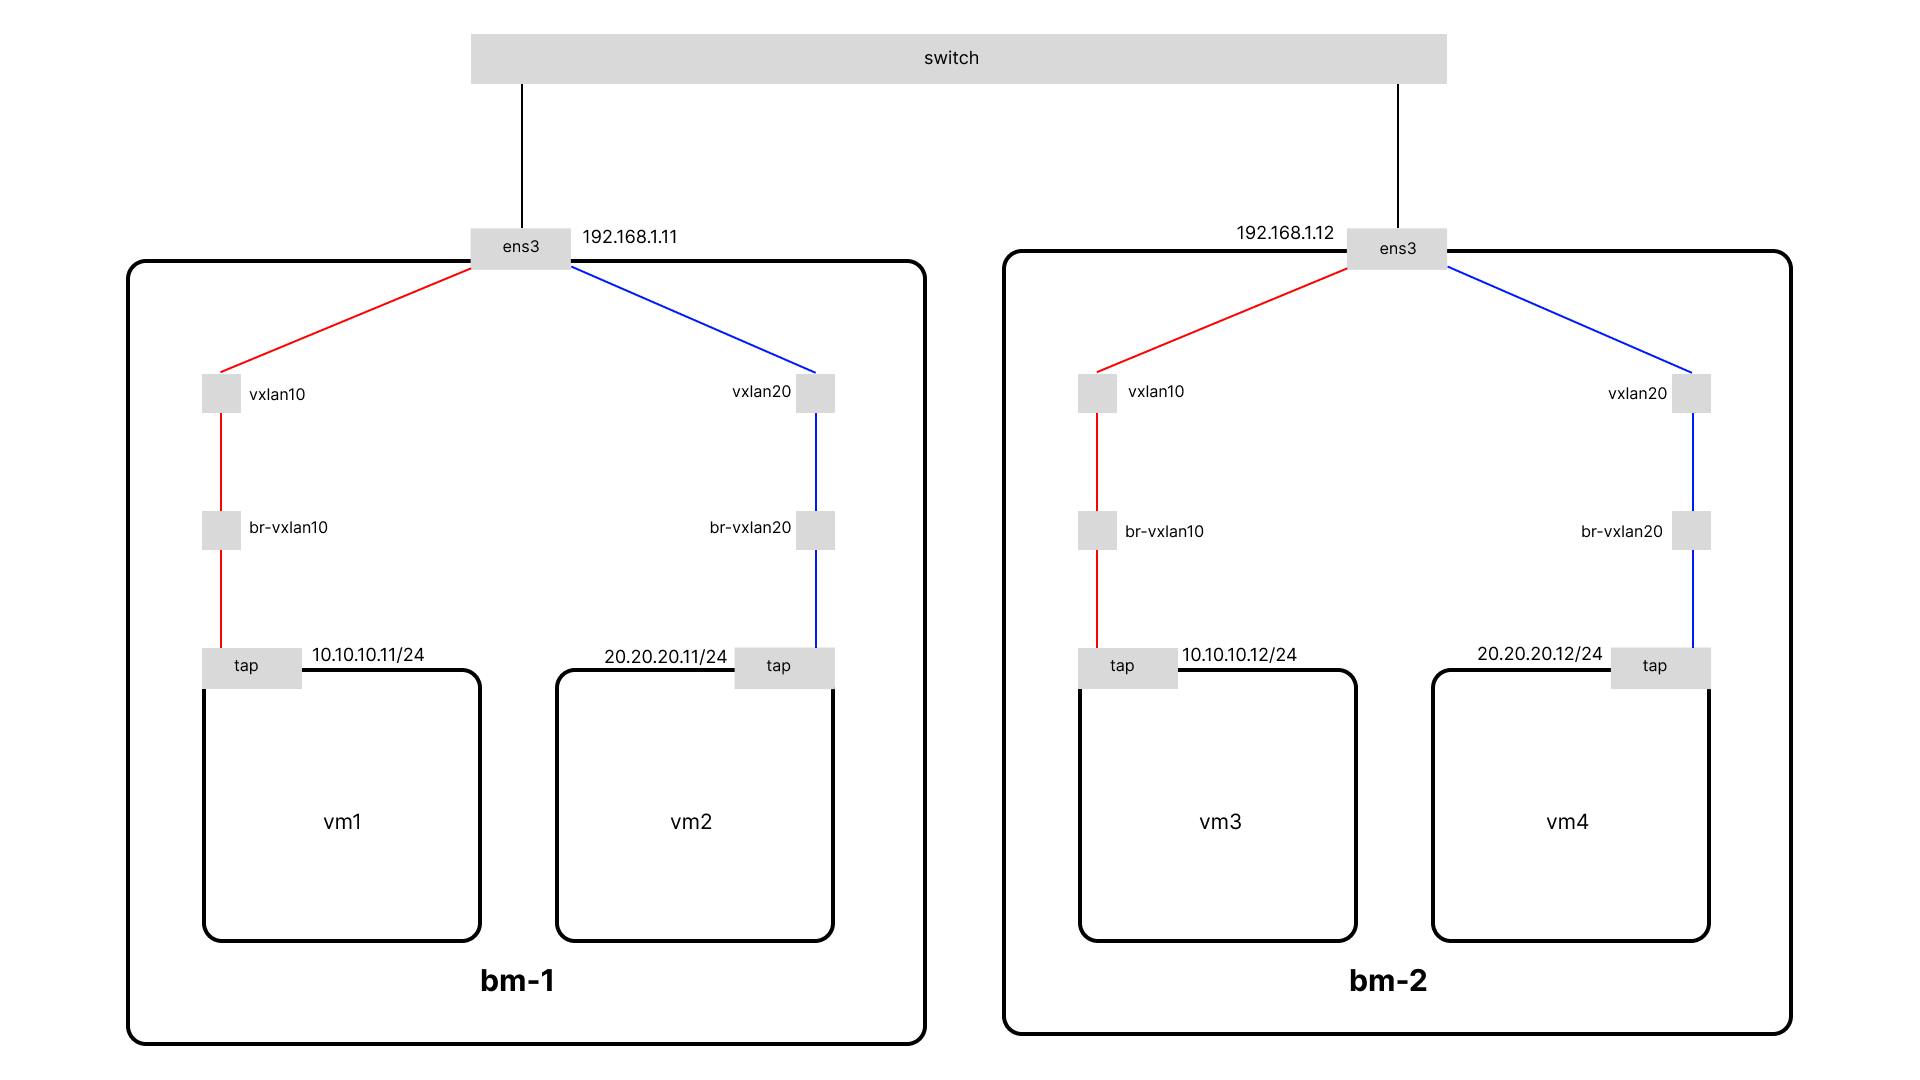
VXLAN is described by IETF RFC 7348, and has been implemented by a number of vendors. The protocol runs over UDP using a single destination port. Here we will use the VXLAN linux tunnel device as an overlay network for connections between VMs on different nodes.
Preparing VXLAN Tunnel
Install packages
Before we can get started configuring things we’ll need to install libvirt, bridge-utils and another package that will help us.
apt update && apt upgrade
sudo apt install -y qemu-kvm virtinst libvirt-daemon-system libvirt-clients bridge-utils libguestfs-tools
We need to start the libvirtd services:
systemctl enable --now libvirtd
Create bridge and VXLAN Interface
To enable the TCP/IP traffic to be encapsulated through these interfaces, we will create a bridge and attach the VXLAN interface to that bridge. In the end, a bridge works like a network hub and forwards the traffic to the ports that are connected to it. So the traffic that appears in the bridge will be encapsulated into the UDP multicast messages.
For the creation of the first VXLAN (with VNI 10) we will need to issue the next commands (in each of the nodes)
ip link add br-vxlan10 type bridge
ip link add vxlan10 type vxlan id 10 group 239.1.1.1 dstport 0 dev ens3
ip link set vxlan10 master br-vxlan10
ip link set vxlan10 up
ip link set br-vxlan10 up
Create virtual network
To enable virtual machines (VM) to use the br-vxlan10 bridge with the attached virtual extensible LAN (VXLAN), first add a virtual network to the libvirtd service that uses this bridge.
cat << EOF > ~/vxlan10-bridge.xml
<network>
 <name>net-vxlan10</name>
 <forward mode="bridge" />
 <bridge name="br-vxlan10" />
</network>
EOF

virsh net-define ~/vxlan10-bridge.xml
virsh net-start net-vxlan10
virsh net-autostart net-vxlan10
Prepare to Guest VM
Configure storage pool
When libvirt is first installed it doesn’t have any configured storage pools. Let’s create one in the default location, /var/lib/libvirt/images:
virsh pool-define-as default --type dir --target /var/lib/libvirt/images
We need to mark the pool active, and we might as well configure it to activate automatically next time the system boots:
virsh pool-start default
virsh pool-autostart default
Download base image
We’ll need a base image for our virtual machines. I’m going to use the ubuntu focal image, which we can download to our storage directory like this:
curl -L -o /var/lib/libvirt/images/ubuntu-focal.img \
https://cloud-images.ubuntu.com/focal/current/focal-server-cloudimg-amd64.img
We need to make sure libvirt is aware of the new image:
virsh pool-refresh default
Lastly, we’ll want to set a root password on the image so that we can log in to our virtual machines:
virt-customize -a /var/lib/libvirt/images/ubuntu-focal.img \
  --root-password password:secret
Create the virtual machine
We’re going to create a pair of virtual machines (one on each host). We’ll be creating each vm with net-vxlan10 network attached. To create a virtual machine on bm-1 named vm1, run the following command:
virt-install \
  -r 3000 \
  --network network:net-vxlan10  \
  --os-variant ubuntu20.04 \
  --disk pool=default,size=10,backing_store=ubuntu-focal.img,backing_format=qcow2 \
  --import \
  --noautoconsole \
  -n vm1
The most interesting option in the above command line is probably the one used to create the virtual disk:
--disk pool=default,size=10,backing_store=ubuntu-focal.img,backing_format=qcow2 \
This creates a 10GB “copy-on-write” disk that uses ubuntu-focal.img as a backing store. That means that reads will generally come from the ubuntu-focal.img image, but writes will be stored in the new image. This makes it easy for us to quickly create multiple virtual machines from the same base image.
On bm-2 we would run a similar command, although here we’re naming the virtual machine vm3:
virt-install \
  -r 3000 \
  --network network:net-vxlan10  \
  --os-variant ubuntu20.04 \
  --disk pool=default,size=10,backing_store=ubuntu-focal.img,backing_format=qcow2 \
  --import \
  --noautoconsole \
  -n vm3
Testing
Accessing the vm
We can access the vm that we have created with the virsh console like this:
virsh console vm1
For vm on bm-2 you can access it in the same way:
virsh console vm3
Now you can login with the root user and password that we have set before.
Adding an ip address
We need to add ip addresses to both vm with ip commands like the following:
# vm1
hostnamectl set-hostname vm1
ip addr add 10.10.10.11/24 dev enp1s0
ip link set enp1s0 up

# vm3
hostnamectl set-hostname vm3
ip addr add 10.10.10.12/24 dev enp1s0
ip link set enp1s0 up
Connection test
We can test the connection between VM with ping:
ping -c 10.10.10.11
ping -c 10.10.10.12
DHCP and Gateway
At this point, your VM can communicate with other VMs on different hosts, but cannot communicate outside or to the internet. Then we need a router as a gateway to the internet. You can make one of the nodes as a router or gateway and also as a DHCP server. On one of the nodes add IP to br-vxlan10, here I will make bm-1 as a gateway and DHCP server.
ip addr add 10.10.10.1/24 dev br-vxlan10
Install dnsmasq
apt install -y dnsmasq
Configure dnsmasq DHCP server for a specific subnet
vi /etc/dnsmasq.d/dhcp
dhcp-range=subnet10,10.10.10.5,10.10.10.250,255.255.255.0,8h
dhcp-option=subnet10,3,10.10.10.1
dhcp-option=subnet10,option:dns-server,8.8.8.8
Restart dnsmasq
systemctl restart dnsmasq
Add nat rule to allow hosts in a network with an IP range of 10.10.10.0/24 to access the internet and translate their source IP address into the system's public IP address when packets leave the system.
iptables -t nat -A POSTROUTING -s 10.10.10.0/24 -j MASQUERADE
Login to vm and use dhclient to get IP from DHCP server:
virsh console vm1
dhclient -v enp1s0
We should now have the IP of the DHCP server. Use the ip command to verify and try to reach the internet.
ip a
ping -c3 8.8.8.8
DHCP and Gateway: Easy Way
Actually libvirt already provides a feature to create a DHCP server, libvirt also uses dnsmasq for its DHCP server. This way we don't need to configure dnsmasq ourselves. First of all, we have to let libvirt manage our bridge:
ip link del br-vxlan10
Then change the libvirt network net-vxlan10 configuration to the following:
virsh net-edit net-vxlan10

<network>
  <name>net-vxlan10</name>
  <uuid>4a84aabc-b5cb-459d-9aab-48bcfa85c300</uuid>
  <forward mode='route'/>
  <bridge name='br-vxlan10' stp='on' delay='0'/>
  <ip address='10.10.10.1' netmask='255.255.255.0'>
    <dhcp>
      <range start='10.10.10.10' end='10.10.10.254'/>
    </dhcp>
  </ip>
</network>
After making the change, we need to restart the libvirt network:
virsh net-start net-vxlan10
Since we previously deleted br-vxlan10 making the vxlan10 tunnel interface independent of br-vxlan10, we need to set master vxlan10 back to br-vxlan10:
ip link set vxlan10 master br-vxlan10
ip link set vxlan10 up
Log in to the vm then renew ip with dhclient -r
dhclient -r enp1s0
Use the ip command to verify and try to reach the internet:
ip a
ping -c 8.8.8.8
Summary
By utilizing the VXLAN tunnel interface in Linux, we can establish an overlay network that connects KVM guest virtual machines running on different hosts. VXLAN enables these virtual machines to communicate over a separate virtual network, creating secure and flexible connectivity between the respective hosts. This is particularly valuable in virtualized environments, facilitating communication among virtual machines hosted on separate systems.